Lab: Traversing 2D Data Structures
Using Iterators
Introduction
In this lab you will implement the iterators for several algorithms that step
through (traverse) a two-dimensional data structure made up of rows and columns.
These algorithms are useful for many different kinds of two-dimensional data
structures.†
The two-dimensional data structure used in this lab is represented by a BoundedEnv
object.‡ A BoundedEnv object models a bounded
rectangular grid that contains objects at various grid locations. Each cell
contains zero or one objects.
| |
0 |
1 |
2 |
3 |
4 |
5 |
6 |
7 |
8 |
| 0 |
|
| 1 |
| 2 |
| 3 |
We refer to locations in the grid by their row and column numbers in parentheses,
such as location (2, 7). Row and column numbers start at 0 rather than 1, so
location (0, 0) refers to the first row and first column. Object obj1
in the grid shown above is in the first row and fourth column, or at location
(0, 3). Object obj5 is at location (4, 8). (This is similar to
the way Java array and ArrayList indices are numbered.)
A traversal through a two-dimensional data structure is an algorithm
that steps through all the elements of the data structure, visiting each element
exactly once. A traversal through an environment steps through all the
locations in the environment. There are many different ways to traverse
through an environment. One common type of traversal is a row-major
traversal, which steps through the environment row-by-row. It first
visits all the locations in row 0, then all the locations in row 1, and so on.
Another common traversal is a column-major traversal, which steps through
the environment column-by-column. It first visits all the locations in
column 0, then all the locations in column 1, and so on.
In this lab you will define iterator classes that implement various traversal
algorithms. For example, the following simple code uses the RowMajorEnvIterator
iterator, which steps through an environment in row-major order.
    RowMajorEnvIterator it = new RowMajorEnvIterator(env);
    while ( it.hasNext() )
    {
        Location nextLoc = (Location) it.next();
        new ColorBlock(highlightColor, env, nextLoc);
    }
The iterator classes you define will be used in a program that defines buttons
for the various traversal algorithms and then illustrates each algorithm by
placing color block objects in the environment in the order of the traversal.
Not all of them will be true traversals, in which every location is visited
exactly once, but all will step through environment locations in some specific
pattern.
Getting Started
In this lab you will be implementing new iterator classes and adding them
to the list of iterators used by the IteratorLab application. The
first thing to do, therefore, is to download the existing code for this application.
Exercise Set 1
- Download the zip file that contains the starting code files for
the Iterator Lab (
IteratorLab.zip)
and unzip it. When you unzip the file and
look in the Code
folder, you will see several files that contain classes you will be
viewing and modifying, a class (TraversalGUI) that you
do not have to read but that the program needs in order to run, and
two jar files (mbsbb.jar and genericEnv.jar)
that contain additional classes the program needs in order to run.
You will also find a Documentation folder that contains
documentation for the classes you will use in this lab. The
core classes in the application are:
IteratorLab (contains the main method)EnvIterator class (the abstract iterator class
you will be extending)
RowMajorEnvIterator (an iterator class that
implements a row-major traversal; you can use this as a template
for other iterator classes)ColMajorEnvIterator (a skeleton iterator class
that you fill in)
ColorBlock class (the traversal puts color blocks
in the environment to illustrate the traversal algorithm; this
class is provided in one of the jar files and is
documented in the Documentation
folder.) BoundedEnv and Location from the AP®
Marine Biology Simulation case study.‡ (These
classes are provided in the jar files and are documented
in the Documentation
folder.)
All classes are covered by the GNU General
Public License.
- Compile and run the program. If you click on the Row-Major Order
button, you should see color blocks filling the locations of the grid
in row-major (top-down, left-to-right) order.
- Experiment with the program to discover what the "Row-Major
Order," "Stop," "Reset," and "Open a
New Window" buttons do.
- Experiment with the "Column-Major Order" button.
What is printed to
System.out? What happens if
you click on the "Stop" button after a couple of iterations?
What happens if you let the traversal run indefinitely?
|
Studying the Algorithms
The starting point of the IteratorLab application is the IteratorLab
class, which contains the main method. Look over the class.
It defines a number of constants that affect the size of the environment
and the look of the graphical user interface. The first thing the class's
main method does is to create the environment through which the
traversal algorithms will step. The last thing it does is to define the
graphical user interface that provides the buttons for running the traversal
algorithms, and that displays them as they run. Before creating the graphical
user interface, though, the main method establishes how objects
in the environment can be displayed, and what traversal algorithms are supported.
The DisplayMap class‡ provides class methods that associate objects
that can be put in an environment with the objects that know how to display
them. The TraversalGUI class provides class methods that
associate an algorithm name (actually a label on a button) with the iterator
class that implements that algorithm.
Exercise Set 2
- Experiment with the constants defined at the top of the
IteratorLab
class to see how changing them affects the application.
|
Next, look at the ColorBlock class, which pairs a color and location
together. The Color class is a standard Java class found in java.awt.
You can create a color by specifying amounts of red, green, and blue (values
between 0 and 255), or you can use one of the predefined colors provided in
the class, such as Color.red. The Location class comes
from the AP® Marine Biology Case Study.‡
java.awt.Color Class (Selected Constants
and Methods)
black, blue, cyan, gray, green,
            magenta, orange, pink, red, white, yellow


Color(int r, int g, int b) |
Exercise Set 3
- What aspects of the
ColorBlock class allow its objects
to be put in an environment? How do ColorBlock
objects get added to an environment? Is the ColorBlock
class needed? Couldn't we just put Color objects
in an environment?
|
Finally, we get to the heart of the IteratorLab application, the
set of traversal algorithms it supports. These are implemented using iterators
that step through an environment, as in the code example in the Introduction
section of this lab. The EnvIterator abstract class partially
implements the standard Java Iterator interface; the RowMajorEnvIterator
class is one example of a concrete subclass of EnvIterator that
completes the implementation. In particular, the Iterator
interface specifies that all iterator classes need to define hasNext
and next methods (used in the code example in the Introduction).
The abstract EnvIterator class implements these methods, but the
implementation of the next method makes use of a protected, unimplemented
findNextLocation method. This method must be implemented
in concrete subclasses of EnvIterator, such as RowMajorEnvIterator.
The way findNextLocation is implemented in each concrete subclass
determines how the iterator traverses the environment. Each concrete subclass
of EnvIterator must also provide a constructor that takes a BoundedEnv
as a parameter, since that is what the TraversalGUI object assumes
is available when it tries to construct a concrete iterator object.
Exercise Set 4
- Does the code example in the Introduction section
behave correctly if the environment is empty?
- Can you create an
Iterator instance? An EnvIterator
instance? A RowMajorEnvIterator instance?
- Looking at the
EnvIterator class, what is the first
location returned by the next method? Does this
depend on the specific implementation of findNextLocation
used by an iterator object?
- How do the statements in the
findNextLocation method
of the RowMajorEnvIterator class ensure that the order
in which the application highlights cells will be row-major order?
|
Adding New Algorithms
Now it's time to write some iterators for traversal algorithms of your own.
Exercise Set 5
- Complete the
ColMajorEnvIterator class, using RowMajorEnvIterator
as a guide. Test your class by running the program and watching the
traversal. Are the cells highlighted left-to-right, going down each
column?
- Create a
ReverseRowMajorEnvIterator class, using RowMajorEnvIterator
as a guide. This algorithm should highlight cells bottom-up, going
left-to-right across each row. In other words, the row order is reversed,
but the column order is not. Edit the main method in the IteratorLab
class to register your new class with an appropriate name. Test
your new class by running the program and watching the traversal.
Remember that each concrete subclass of EnvIterator
must provide a constructor that takes a BoundedEnv as
a parameter. That constructor could use either of the constructors
in EnvIterator: the one that takes only a bounded environment as a
parameter, or the one that takes both a bounded environment and a
starting location.
- Create a
ReverseColMajorEnvIterator class, using ColMajorEnvIterator
as a guide. This algorithm should highlight cells right-to-left, going
up each column from the bottom. In other words, both the row and column
orders should be the reverse of ColMajorEnvIterator.
Test your new class.
- Create a
Diagonal class. This algorithm should highlight
cells along the diagonal from the upper-left corner to the lower-right
corner.** Again, it is not a true traversal of the environment.
Before you attempt to write the code, list the locations that you
want the iterator to visit. When you're done with the implementation,
test your new class.
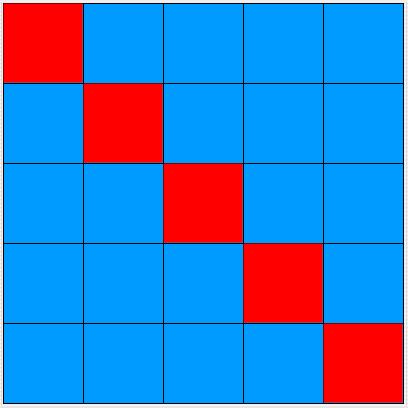
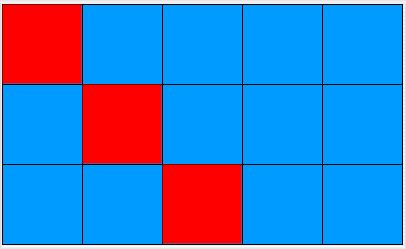
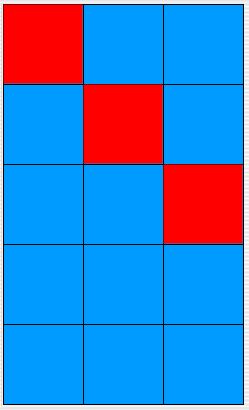
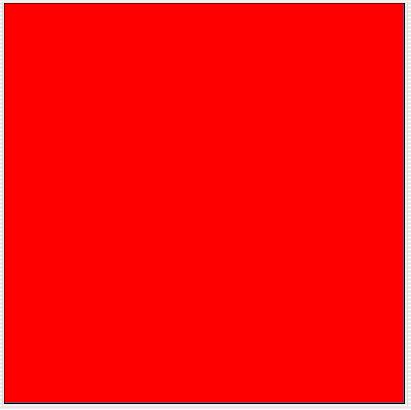
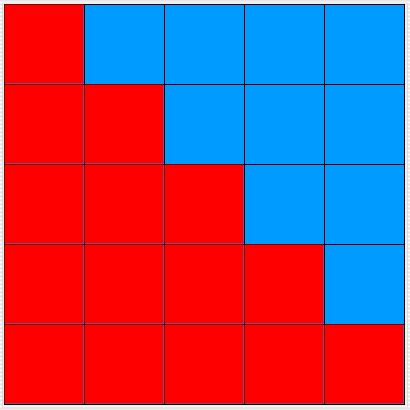
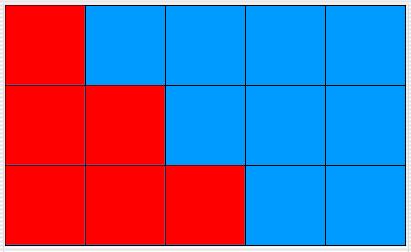
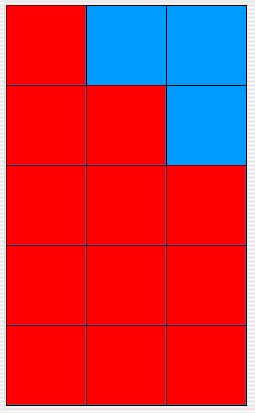
**The diagonal algorithm goes to exactly the lower-right corner only
if the environment is square. If it is not square, the algorithm
traverses down and to the right until it comes to the last column
or the last row, depending on whether the environment is higher than
it is wide or wider than it is high. The diagrams below show the behavior
for a 5 x 5 environment, a 3 x 5 environment, a 5 x 3 environment,
and a 1 x 1 environment.
- Create a
Triangle class. This algorithm should highlight
(fill in) all the cells below the diagonal you produced in the preceding
exercise. (It will form a true triangle only if there are at least
as many columns in the environment as there are rows.) Before
you attempt to write the code, list the locations that you want the
iterator to visit. When you're done with the implementation, test
your new class. The diagrams below show the behavior for a 5 x 5 environment,
a 3 x 5 environment, a 5 x 3 environment, and a 1 x 1 environment.
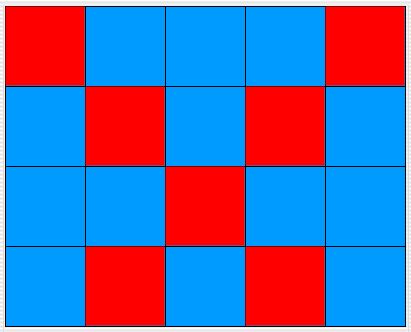
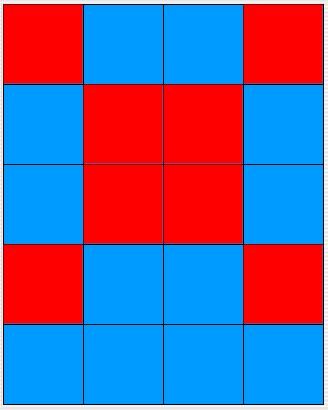
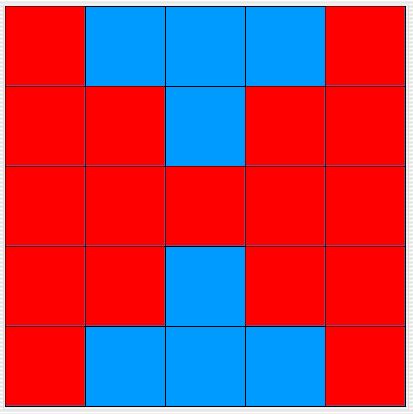
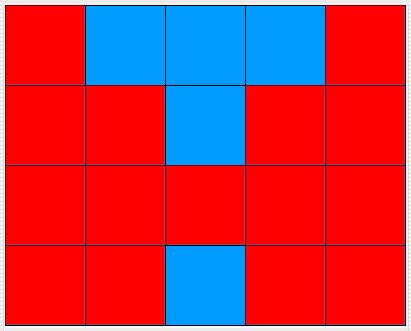
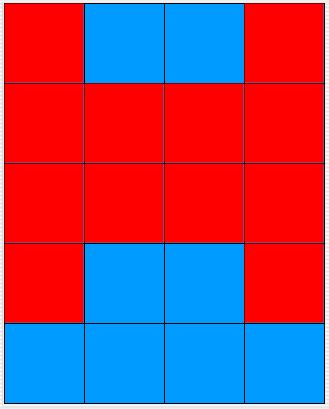
- Create a
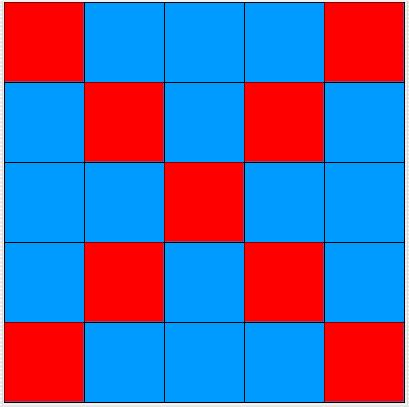
DoubleDiagonal class. This algorithm should
highlight the cells along the two diagonals, from the upper-left corner
to the lower-right corner** and from the upper-right corner to the
lower-left corner.** If the environment has an odd number of columns,
the two diagonals will cross at a single location, but your "iterator"
should not return that location twice. Before you attempt to
write the code, list the locations that you want the iterator to visit.
When you're done with the implementation, test your new class. (**Again,
whether the algorithm goes exactly to the opposite corner depends
on whether the environment is square.) The diagrams below show
the behavior for a 5 x 5 environment, a 4 x 5 environment, a 5 x 4
environment, and a 1 x 1 environment.
Hints: You can draw the double diagonal by drawing a line from
the upper-left corner down and to the right and drawing a line from
the upper-right corner down and to the left. OR, you
can visit both locations in the first row, followed by both locations
in the 2nd row, etc. This algorithm may be easier.
You know one of the two locations in each row from your implementation
of the Diagonal class, and you can calculate the other
from it, given the number of columns in each row. You'll
need a way of recognizing whether you're visiting the first location
in a row, in which case the next location should be the other location
in the row, or visiting the second location, in which case the next
location will be on the next row. If both locations are the
same location (single cross-over point), then you do not want to visit
it twice.
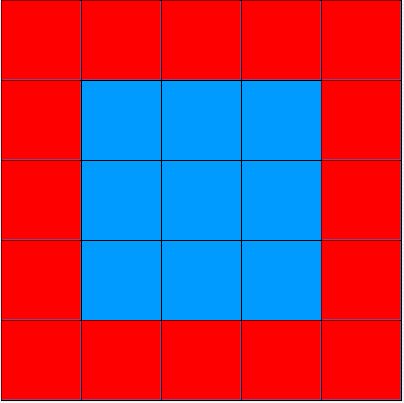
- Create a
PerimeterTraversal class. This algorithm should
highlight the cells along the four sides of the environment, but not
the interior cells. This is actually a traversal of the environment's
perimeter rather than of the environment as a whole, because you will
not be visiting every location in the environment. Before you
attempt to write the code, list the locations that you want the iterator
to visit in order to find a pattern. When you're done with the implementation,
test your new class. The diagrams below show the behavior for
a 5 x 5 environment, a 2 x 5 environment, a 3 x 1 environment, and
a 1 x 1 environment.
- Create a
SpiralTraversal class. This algorithm should
highlight the cells along the perimeter of the environment, then spiral
in and highlight the cells along the perimeter of the unhighlighted
cells, then spiral in again and highlight the next perimeter of unhighlighted
cells. Continue in this way until you have visited every location
in the environment. Before you attempt to write the code, list
the locations that you want the iterator to visit in order to find
a pattern. When you're done with the implementation, test your new
class.
- Create a
Butterfly class. This algorithm should highlight
the cells in the left and right side quadrants formed by the double
diagonal you produced in Exercise 6. Before you attempt to write the
code, list the locations that you want the iterator to visit. When
you're done with the implementation, test your new class. (See previous
exercises to read more about square and non-square environments.)
The diagrams below show the behavior for a 5 x 5 environment, a 4
x 5 environment, a 5 x 4 environment, and a 1 x 1 environment.
|